
The Aurora Glade bonus is probably the first mission area where teamwork and coordination will be the biggest deciding factors for a successful bonus. It is also the first area where players can become genuinely confused about what has to be accomplished to get the bonus.
Please note that this portion of the map has been rotated 135 degrees counter-clockwise for clarity, so the bonus arena is shown as it is viewed for the first Time by people emerging into that area.
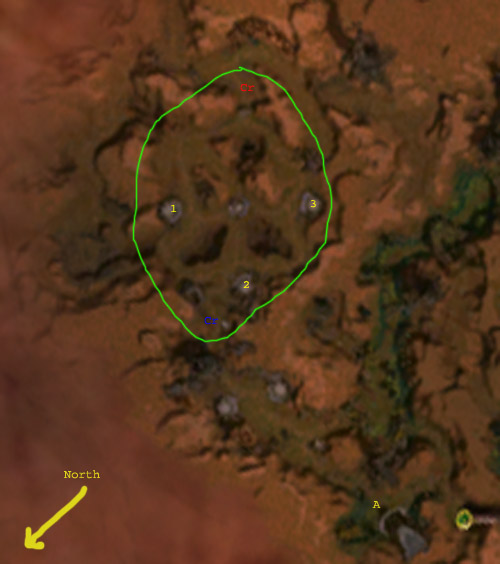
Notes:
The ugly green circle represents the boundaries of the "arena."
The yellow A denotes the NPC who gives you the bonus quest to defeat Demagogue (the goal of the bonus is to kill Demagogue).
The blue Cr denotes the thorn pedestal where crystals can be picked up by the players.
The red Cr denotes the enemy thorn pedestal location.
The yellow numbers 1, 2, and 3 are the crystal pedestals that need to be controlled.
Here is the object of the MISSION. Place a crystal on all three crystal pedestals so they light up blue. The mission will FAIL if the enemy team changes all three crystal pedestals to red. Change them all to blue and you get sent to fight the mission boss to complete the game and don't get to fight the bonus boss.
The BONUS, however, requires a different approach. You are not trying to win in the arena (or you get sent on without bonus) but you are certainly not trying to lose either. You're supposed to kill Demagogue, but where is he and how do you beat him? What you need to do to get the bonus is a force a STALEMATE.
So how do you force a stalemate? Easy. Don't take over all of the pedestals. As long as you hold a maximum of one or two blue pedestals, you just need to hold off the enemy until they run out of men to keep sending to the pedestals. Once that happens, Demagogue will be easy to kill when he's alone. Look for him later just beyond their thorn pedestal at the red Cr.
That's all you need to do. Once he's dead, just take all of the pedestals and get sent on to finish the easy part of the mission.
---
Ok, so you need more help? A recipe for success? Read on. Mild spoilers are ahead, obviously.
Once you attune the two early pedestals to blue and people rush to the arena, the team must split into two groups. One group is made up of everyone in the party minus one person. This one person will act as a "runner" for the party and ideally is someone with sprint or other similar ability. Everyone else must stay together and fight as a defending team.
Defense group: Grab the crystal in the thorn pedestal at blue Cr. Take this crystal to pedestal 1 and capture it. Your objective now is to STAY CLOSE and HOLD THIS POSITION.
Runner: Wait at the blue Cr while the rest of the team takes the first crystal to pedestal 1. As soon as pedestal 1 is turned blue, a new crystal will appear. Grab that crystal and capture pedestal 2. Immediately run back to the blue Cr and grab yet another crystal. Take this crystal over to pedestal 1 and stand by.
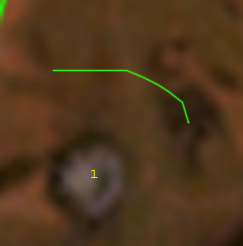
Defenders of pedestal 1 need to make sure they stay close to the pedestal. Do not wander farther than the green line. If you wander too far ahead, large groups of enemy will aggro and defense will be extra difficult. Spreading out will only lead to people getting killed, making the bonus much harder to complete. Healing is also made difficult if your crystal runner hapens to be the party monk.
Here is where a ranger primary or secondary with the skill Pin Down really comes in handy. As the enemy crystal runner comes around the corner, target him and pin. This will give the defending party extra breathing room with extra Time to kill the enemy runner. There is no need for the ranger to go out of his/her way to reach the runner. Just stand on teh pedestal platform and hit your mark. That should be plenty far away to hit your mark and keep the runner slowed enough to be swarmed on by the defenders. Hammer warriors with unconditional knockdown skills are also very useful for this.
The purpose of the runner standing by is important. By waiting next to the pedestal (and out of harm's way), the runner provides "insurance" against capture by the enemy team. As long as pedestal 1 is blue, the enemy will keep returning to it with crystals. On the off chance that the enemy sneaks in a crystal and captures the pedestal, the job of the runner is to immediately change it back to blue and then run back to grab another crystal from blue Cr and come back to pedestal 1. Be sure that your runner is a non-melee player, as you cannot drop the crystal without it vanishing and having to go get another.
It won't take long to establish a rhythm with the team. The early crystal runner groups are the most difficult, as the enemy team has the most available people at that point. As long as pedestal 1 is held, the enemy will always come to it first. Again, this is why having the party runner standing by with an extra crystal is crucial to success, so that the stalemate is reinforced. You give up no ground and the enemy runner is forced to keep coming back to the same pedestal.
After the fifth or sixth enemy crystal runner, the enemy force will be substantially weaker. Instead of sending a runner plus several escorts, you may only see the runner alone or maybe with one escort. At this point it is relatively safe to advance forward directly to the red Cr, keeping an eye out for enemy runners. Again, it is the ranger's primary duty to pin him down if/when spotted.
When you approach the red Cr, you will see that very few, if any, enemies remain. If there is no resistance, march inside the enemy camp and Demagogue will be there undefended. Kill whoever is there and don't let any crystal runners sneak by you. When every enemy is dead, take a crystal from either Cr and go cap the third pedestal.
And that's it. Easy as pie.
There are certainly other methods that work just as well if not better, but this is the simplest way to win bonus with a competent team.
Notes:
It is virtually impossible to do this with only one human player. Henchmen will always follow the player, so there is no way to divide the party in order to grab crystals.
It IS possible to do this quest with just two human players and the rest henchman, but difficult. The henchmen are programmed to follow the last player to move that is within their aggro range, so it is difficult to get set up, especially if pedestal 1 gets taken and the runner has to re-capture. The henchmen are likely to chase the runner as he/she goes back for another crystal.